Getting Started with Unity
Complete tutorial for setting up your first Needle Engine project in Unity - from samples to manual setup, TypeScript components, and NpmDef packages
Learn how to create your first interactive web project with Needle Engine in Unity.
:::tip Already Installed? If you haven't installed Needle Engine for Unity yet, see the Unity Integration page first. :::
:::tip Unity Developer? New to web development? Start with For Unity Developers to learn how Unity concepts translate to Needle Engine and TypeScript. :::
:::details Video: Getting Started with Unity (16 minutes) This comprehensive video tutorial walks you through setting up Needle Engine in Unity and creating your first interactive web project.
:::
Choose Your Starting Point
There are three ways to get started. Pick the one that fits your workflow:
🎨 Start from a Sample (Recommended)
Best for: Learning, exploring features, getting inspired
100+ samples covering a wide range of topics, use cases, and industries.
Browse online: Samples page
Install in Unity:
Open
Needle Engine > Explore SamplesClick "Install Samples" (or download manually)
Choose any sample and click "Open Scene"
Press Play!
:::tip Samples are Read-Only (Easy Updates!) Samples are UPM packages, so they're read-only by design.
To modify:
Scenes: When you open a sample via the Samples window, it's automatically copied to your
Assets/folder where you can edit itAdditional Assets: Some materials or assets may need to be manually copied to your
Assets/folder, depending on the sampleScripts: Copy to your web project's
src/folder to customize behavior :::
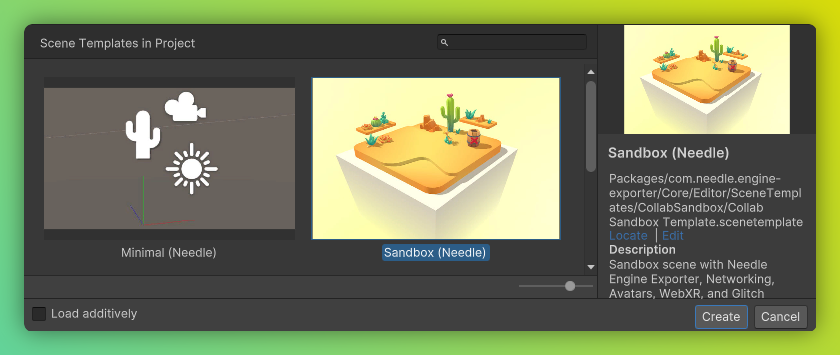
🚀 Start from a Scene Template (Fast!)
Best for: Quick prototypes, starting fresh projects
Go from idea to prototype in seconds with pre-built scene templates.
Steps:
Click
File > New SceneSelect a template with (needle) in the name
Click "Create"
Press Play!
Recommended: Collaborative Sandbox - includes interactivity, multiplayer, and physics.
⚙️ Start from Scratch (Manual Setup)
Best for: Full control, understanding the workflow
Want full control? Follow these steps to recreate the "Minimal (Needle)" template manually.
1. Create a new empty scene
2. Set up your scene for exporting
Add an empty GameObject, name it "Exporter"
Add the
Needle Enginecomponent to itThis component:
Creates and manages your web project
Shows warnings for outdated packages
Provides quick access to project settings
3. Choose a web project template
Select a template for your project. Default: Vite (fast web bundler)
4. Press Play to install and start your web project
:::tip Project Name & Location By default, the project name matches your scene name. Change it via "Directory Name" (path is relative to your Unity project). :::
:::tip Custom Templates Create your own templates: Project View > Create > Needle Engine > Project Template
Template types:
Local: Folder copied from disk
Remote: GitHub repository cloned :::
Understanding Project Structure
When you create a Needle Engine project, you get both Unity assets and a web project:
:::: file-tree name="Unity Project" showall="true" ::: file Assets/ This is where project specific/exclusive assets live. ::: ::: file Packages/ This is where packages installed for this project live. A package can contain any asset type, and can be added to multiple Unity projects. It therefore is a great method to share code or assets. To learn more about packages, see the Unity documentation about packages. ::: ::: file Packages/Needle Engine/ Needle Engine for Unity is a package that contains all the necessary files to export your Unity scene to a web project. It also contains the built-in components and tools for creating interactive web projects. You can update the package via the Unity Package Manager. ::: ::: file Packages/Needle Engine/Core/ ::: ::: file Packages/Needle Engine/Core/Runtime/ ::: ::: file Packages/Needle Engine/Core/Runtime/Components/ Contains all built-in components for Needle Engine. You can learn more about them in the Components Reference. Looking at samples and going through this folder are great ways to see what components are available and how they can be used in your projects. ::: ::::
Web Project Location:
When creating a new web project in Unity, you can choose to create it from a local template (by default we ship a Vite based web template). The web project lives alongside your Unity project:
Use Web Projects Directly from Github
Besides the web project templates that already ship with the Unity integration you can setup your web project directly from github by entering the Github repository URL in the Project Folder field.
When creating a new web project the repository will be cloned (or downloaded if you don't have git installed). The repository is then searched for a needle.config.json file. If none can be found in the cloned repository the root directory will be used.
Examples of remote template projects can be found on github.com/needle-engine
Temporary Projects
If you're planning to only add custom files via NpmDefs and not change the project config (e.g. for a quick fullscreen test), you can prefix the project path with Library. The project will be generated in the Unity Project Library and does not need to be added to source control (the Library folder should be excluded from source control). We call these projects temporary projects. They're great for quickly testing out ideas!
Writing TypeScript Components
Write TypeScript code that automatically becomes available in Unity as C# stub components.
How it works:
Write TypeScript classes in your web project
C# stubs are generated automatically
Attach components in Unity Editor
Properties marked with
@serializableappear in InspectorSee changes in seconds (hot reload)
:::tip Perfect Team Workflow Web Developer: Writes components, manages web project
3D Designer: Edits scenes, content, and settings in Unity
Result: Both see changes instantly with hot reload 🔥 :::
Option 1: Scripts Directory (Simple)
Best for: Single projects, quick prototyping
Add components in the scripts folder (usually src/scripts/). C# stubs are generated automatically.
Example:
What happens next:
Save the TypeScript file
A C# stub is generated in
Assets/Needle/Components.codegen/The component appears in Unity's Add Component menu
Attach it to GameObjects and configure properties in the Inspector
Learn more about creating components →
Option 2: NpmDef (Advanced)
Best for: Sharing code between multiple projects, team workflows
NPM Definitions (NpmDef) are NPM packages integrated into Unity Editor.
Benefits:
Share scripts across multiple web or Unity projects
C# stubs generated automatically
Version-controlled packages
Easier collaboration and code reuse
Creating an NpmDef
1. Create:
Right-click in Unity Project browser
Select
Create > NPM Definition
2. Install to project:
Select your
Needle EnginecomponentAdd the NpmDef to the dependencies list
Click "Install"
Restart the dev server
3. Edit code:
Double-click the NpmDef asset
Opens VSCode workspace automatically
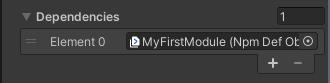
:::tip How it Works Adding an NpmDef to dependencies adds the local NPM package to package.json:
:::
Example NpmDef structure:
Troubleshooting
Common issues:
Server won't start
Install Node.js (version 18.x or newer)
Can't edit code
Install VSCode (recommended editor)
Components not showing in Unity
Restart Unity or click "Generate C# Components" on Needle Engine component
Hot reload not working
Check console for errors, restart dev server with "Install" button
Web project not found
Check the Directory Name field points to correct location
Port already in use
Change port in vite.config.js or close other dev servers
Still having issues?
Check the FAQ for more solutions
Ask in Discord for community help
Review the full troubleshooting guide
Next Steps
Now that you have your first project set up, continue learning:
Learn the Unity Workflow
Working with Unity Integration - Complete Unity workflow guide
Exporting Assets - What gets exported and how
Editor Sync - Live sync between Unity and browser
Start Scripting
For Unity Developers - Complete learning path
C# to TypeScript Translation - Translate your C# knowledge
TypeScript Essentials - Language basics
Explore Features
Component Reference - All built-in components
XR/AR Support - VR and AR experiences
Networking - Multiplayer and collaboration
Deployment - Share your website
Get Inspired
100+ Samples - Interactive examples
Showcase - Community projects
Video Tutorials - Step-by-step guides
Last updated